5. Monitor and Manage Cluster
dispy includes httpd module that provides HTTP interface to monitor and manage clusters with a web browser; it works with common web browsers, including in iOS and Android devices.
5.1. HTTP Server
dispy.httpd module provides a HTTP server to monitor and manage clusters. It doesn’t require / use apache or other web servers. HTTP server can be created in the client program with:
-
class
dispy.httpd.DispyHTTPServer(cluster, host='', port=8181, poll_sec=10, DocumentRoot=None, keyfile=None, certfile=None, show_job_args=True)¶ Creates an instance of HTTP server which will listen for connections at given host and port.
cluster is dispy cluster, created with JobCluster or SharedJobCluster.
host should be a string, either IP address or name of the host where HTTP server will wait for connections from client (browser). The default value of ‘’ will bind the server to all configured network interfaces.
port should be a number HTTP server binds to. Web browsers can monitor and manage cluster by connecting to http://<host>:<port> if SSL (https) is not used and https://<host>:<port> if SSL is used.
poll_sec is number of seconds (interval) the client waits between update requests from the server. Smaller values of poll_sec will cause more frequent updates so the information shown is more accurate, but cause more network traffic/load. Bigger values of poll_sec are more efficient but the status in browser may not reflect more recent information.
poll_sec can be also be changed in the browser dynamically.
DocumentRoot is directory where monitor.html, dispy.css, etc. files needed for the service are stored. If this is not set, the directory is assumed to be data directory under the directory where dispy.httpd module is stored.
keyfile and certfile, if given, will be used to configure SSL so https can be used between browser and HTTP server. If both key and certificate are in the same file, then it should be given as certfile.
show_job_args boolean parameter controls whether job arguments are shown in web browser. Default value True sends job arguments to the browser. If jobs are created with large data as arguments, though, it may be quite inefficient to exchange that data between the scheduler and the browser. In such case, it is strongly recommended to set this parameter to False so viewing jobs on a node doesn’t cause performance issues. Note that httpd converts job arguments to strings (if arguments are not primitive types, the classes must provide serialization methods) before sending them to the browser. If serialization is not possible, httpd may fail. Setting show_job_args to False will prevent this.
This parameter can also be updated dynamically in ‘Monitor’ page with web browser.
The HTTP server has following methods:
-
dispy.httpd.add_cluster(cluster)¶ If more than one cluster is created in a program, those clusters can be added to httpd with this method. In such a case, the web pages show choice of all the added clusters so appropriate cluster can be monitored / managed. In addition to these clusters, the choices include a cluster named ‘* Combined’ that combines information about all the clusters.
-
dispy.httpd.del_cluster(cluster)¶ Deletes given cluster from httpd.
-
dispy.httpd.cluster_status(status, node, job)¶ This method is invoked by cluster’s cluster_status (see JobCluster). When DispyHTTPServer is initialized, it sets cluster’s cluster_status to this method only if the current cluster_status is None (i.e., user didn’t provide their own status function). If, however, it is necessary to customize cluster_status, for example, another function needs to be called with cluster status updates, then that function may do the necessary bookkeeping and then call this method (i.e., chaining cluster status notifications).
-
dispy.httpd.shutdown(wait=True)¶ Shuts down HTTP server. If wait is True, the server waits for current poll_sec period before shutting down so the web browser gets all the updates.
Note
When cluster status is being monitored, the HTTP server sends only changes to cluster status between updates to browser (for efficiency); i.e., each time browser gets the status update at current poll_sec interval, the server sends the changes since last time browser requested data. The browser computes full current status with these updates. Consequently, the status can be viewed in only one browser; if more than one browser is used, they will not get full information.
-
If more than one cluster is created in a program, same HTTP server can be used for all the clusters. In this case, create HTTP server with any one cluster as above. When creating other clusters, pass cluster_status parameter of set to HTTP server’s cluster_status (see JobCluster for details). The status of nodes and jobs shown would be combined status from all clusters (e.g., all jobs submitted/done for all clusters). If it is necessary to view each cluster separately, multiple HTTP servers can be created with different clusters and port numbers appropriately. Then different browser clients / tabs can be used to view status information about different clusters at those ports.
5.2. Example
Following example creates a http server so cluster can be monitored and managed in a web browser:
# example program that sends object instances in local program
# as arguments to distributed computation
class C(object):
    def __init__(self, s, i):
        self.s = s
        self.i = i
    # provide __str__ so instances of C are shown with useful info
    # when monitoring jobs in 'Node' page
    def __str__(self):
        return 'C(%s, %.4f)' % (self.s, self.i)

def compute(obj, n=5):
    # obj is an instance of C
    import time
    time.sleep(n)
    return n * obj.i

if __name__ == '__main__':
    import dispy, random

    # create cluster
    cluster = dispy.JobCluster(compute, depends=[C])

    # import dispy's httpd module, create http server for this cluster
    import dispy.httpd
    http_server = dispy.httpd.DispyHTTPServer(cluster)

    # cluster can now be monitored / managed in web browser at
    # http://<host>:8181 where <host> is name or IP address of
    # computer running this program

    for i in range(8): # submit jobs to cluster
        c = C(str(i), random.uniform(1, 9))
        job = cluster.submit(c, n=random.randint(5, 20))
        job.id = i

    cluster.wait() # wait for all jobs to finish
    http_server.shutdown() # this waits until browser gets all updates
    cluster.close()
The class C provides __str__ method so when jobs are monitored in the browser (in the Node section), this method is used to show the arguments of a job (see pictures below). If a user class doesn’t provide __str__, it may be shown as “C object at 0x…” when used as argument to job.
5.3. Client (Browser) Interface
After the above cluster has been created, it can be monitored and managed in a web browser at http://<host>:8181, where <host> is name or IP address of computer running the above program. If SSL certificates are used to setup HTTP server, https protocol should be used in URL above. There are currently 3 sections (menu items):
5.3.1. Monitor Cluster (Nodes)
The Monitor section shows summary of jobs and nodes:
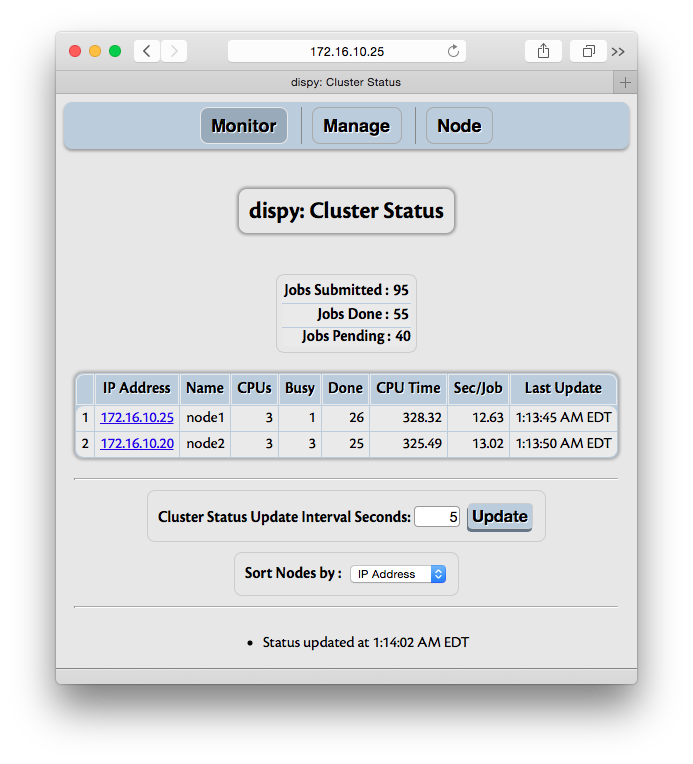
The information shows summary of jobs and nodes in cluster. Jobs summary shows total number of jobs submitted so far, done (finished or cancelled) and pending jobs. The nodes summary shows IP address, name (if available) of the node, number of CPUs used by dispy on that node, number of CPUs currently being used (shown as “Busy”), number of jobs done, total CPU time in seconds used by the jobs done on that node, number of seconds used per job and the latest time the node accepted a job for execution or finished executing job. The nodes are sorted by default on the IP address in descending order. The field to sort on can be changed; however, as other fields are not necessarily unique, sorting on other fields is inefficient, so if there are many nodes, especially with frequent updates, choose IP address as the field to sort. Sorting can be changed even after cluster is closed. ‘Show Job Arguments’ checkbox controls whether job arguments are shown in ‘Node’ page. If job are created with large data as arguments, it is recommended to disable this, as otherwise exchanging that data between scheduler and web browser can be quite inefficient.
The control ‘Select Nodes’ can be used to execute ‘allocate_node’, ‘deallocate_node’ or ‘close_node’ actions on selected nodes for selected cluster (with ‘Cluster’ control).
5.3.2. Node Information (Monitor / Manage Jobs)
Each node in Monitor and Manage section is a hyper link which when followed (to Node menu) shows details about that node, including jobs currently being executed:
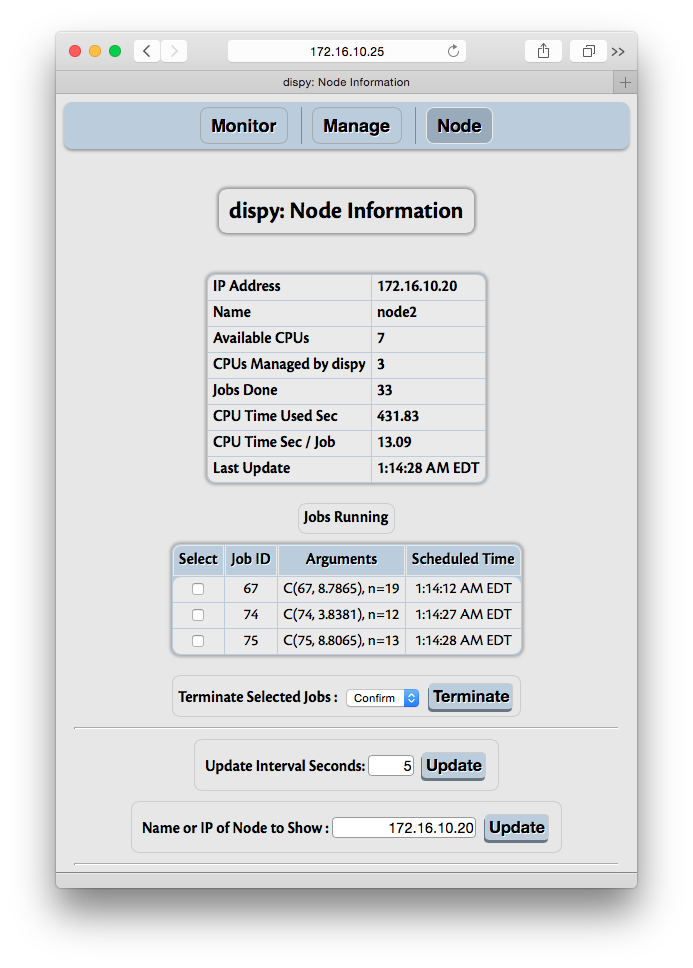
The summary of node includes number of CPUs available on the node, CPUs allocated for dispy (which may be less than available CPUs if –cpus argument was used to start dispynode (Server)), number of jobs done by the node, CPU time used and the last time it accepted a job or finished a job.
If the node is currently executing a job, they are shown with the ID for each job (job.id, associated by user after the job is submitted), arguments to job and the time job was scheduled. The ID and arguments to jobs are converted to strings by HTTP server before sending to the client. If any of these are instances of user provided classes, it may be useful to provide __str__ method, as done in the example above. Otherwise, Python’s default __str__ method may show it as simply an instance of a class, which may not be very useful.
“Data Sent” and “Data Received” rows show amount of data sent to / received from node. This information may be useful to understand application or network performance. Each time a job or file is sent, the size of (serialized) data is counted as data sent and each time a job reply or file is received, the size of (serialized) data is counted as data received. Note that overheads of protocol are not counted in these fields.
If necessary, jobs can be selected and terminated (killed).
The control ‘Node Action’ can be used to execute ‘allocate_node’, ‘deallocate_node’ or ‘close_node’ actions for the node for selected cluster (with ‘Cluster’ control).
5.3.3. Manage Cluster (Nodes)
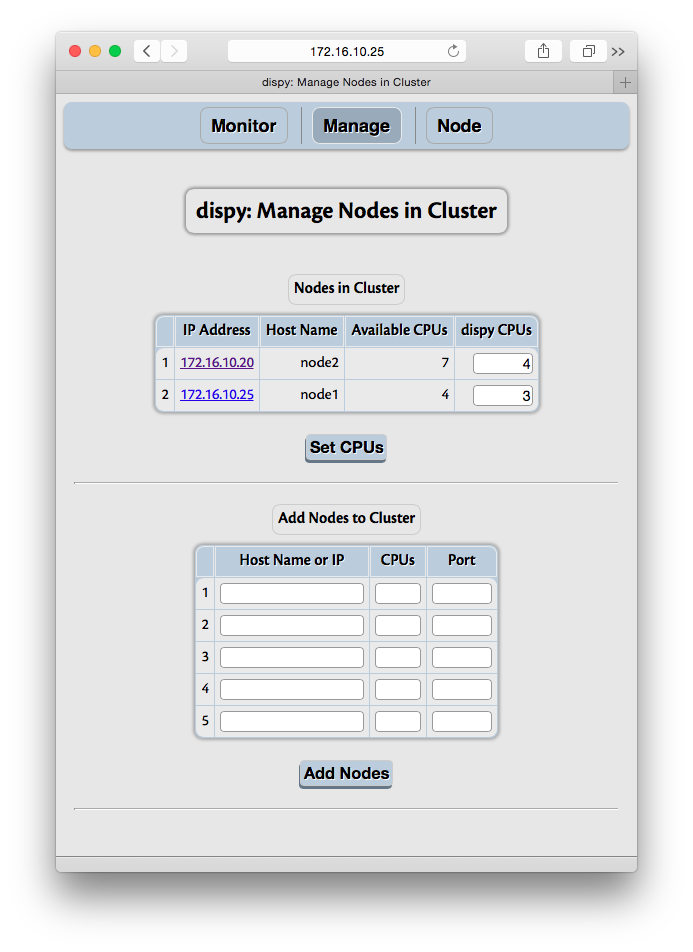
Additional nodes can be dynamically added to the cluster with Manage feature. The nodes can specified with host name or IP address, or alternately, with wildcards, as per nodes parameter of JobCluster. If name or IP address is used with JobCluster, desired CPUs can also be given. If wildcard is used for IP address or SharedJobCluster is used, then CPUs is ignored. Additionally, if JobCluster is used, the CPUs of current nodes in the cluster can be updated dynamically. If the CPUs are decreased from currently busy CPUs number, no additional jobs are scheduled beyond given number, but currently running jobs are left running. If it is necessary to immediately reduce CPUs used, currently running jobs can be terminated after reducing the CPUs to use.
Monitor and Node sections have “Update Interval Seconds” input. Its initial value is the value of poll_sec parameter to HTTP Server. The client queries the server for updates at this interval. As mentioned above, depending on how frequently jobs are executed, this value may be increased or decreased. The updates can be disabled by giving the value 0 (or less than 0). The update can be forced any time (whether automatic updates are enabled or disabled) by clicking on the “Update” button.